Install remote desktop connection on Ubuntu (XRDP)

Install Gui

sudo apt-get install lubuntu-desktop

sudo apt-get remove unity unity-2d

sudo apt-get remove unity unity-2d-places unity-2d unity-2d-panel unity-2d-spread unity-asset-pool unity-services unity-lens-files unity-lens-music unity-lens-applications gir1.2-unity-4.0 unity-common indicator-sound indicator-power indicator-appmenu libindicator6 indicator-application evolution-indicator indicator-datetime indicator-messages libnux-1.0-0 nuxtools

Install XRDP

sudo apt-get install xrdp

lxsession -e LXDE -s Lubuntu

echo "lxsession -s Lubuntu -e LXDE" > ~/.xsession

sudo service xrdp restart

Finally you can connect with remote desktop connection.

Install SteamCMD

Downloading SteamCMD

Windows

1. Create a folder for SteamCMD.

For example

C:\steamcmd

2. Download SteamCMD for Windows: https://steamcdn-a.akamaihd.net/client/installer/steamcmd.zip

3. Extract the contents of the zip to the folder.

Linux

Create a user account named steam to run SteamCMD safely, isolating it from the rest of the operating system. Do not run steamcmd while operating as the root user – to do so is a security risk.

1. As the root user, create the steam user:

useradd -m steam

2. Go into its home folder:

cd /home/steam

Package from repositories

1. It’s recommended to install the SteamCMD package from your distribution repositories, if available:

Ubuntu/Debian

sudo apt install steamcmd

 Note:If you are using a 64 bit machine you will need to add multiverse

 sudo add-apt-repository multiverse
 sudo dpkg --add-architecture i386
 sudo apt update
 sudo apt install lib32gcc1 steamcmd 

RedHat/CentOS

yum install steamcmd

Arch Linux

git clone https://aur.archlinux.org/steamcmd.git
cd steamcmd
makepkg -si

2. Link the steamcmd executable:

ln -s /usr/games/steamcmd steamcmd

Docker

If your server is running Docker, you can simply use:

docker run -it --name=steamcmd cm2network/steamcmd bash

steamcmd.sh location: /home/steam/steamcmd

This image can be used as a base image for Steam-based dedicated servers. Example: https://hub.docker.com/r/cm2network/csgo/

You can find the associated Docker Hub page here: https://hub.docker.com/r/cm2network/steamcmd/

Manually

1. Before you begin, you must first install the dependencies required to run SteamCMD:

Ubuntu/Debian (x86-64)

sudo apt-get install lib32gcc1

RedHat/CentOS (x86-64)

yum install glibc.i686 libstdc++.i686

2. As the root user, escalate to the steam user:

su - steam

If you’re not logging in as root and you instead use sudo to perform administration, escalate to the steam user as follows:

sudo -iu steam

3. Create a directory for SteamCMD and switch to it.

mkdir ~/Steam && cd ~/Steam

4. Download and extract SteamCMD for Linux.

curl -sqL "https://steamcdn-a.akamaihd.net/client/installer/steamcmd_linux.tar.gz" | tar zxvf -

5. Install tmux and/or screen for easy server management

sudo apt-get install tmux screen -y;

macOS

1. Open Terminal.app and create a directory for SteamCMD.

mkdir ~/Steam && cd ~/Steam

2. Download and extract SteamCMD for macOS.

curl -sqL "https://steamcdn-a.akamaihd.net/client/installer/steamcmd_osx.tar.gz" | tar zxvf -

Running SteamCMD

On first run, SteamCMD will automatically update and enter you into a Steam> prompt. Type help for more information.

Windows

Open a Command Prompt and start SteamCMD.

cd C:\steamcmd
steamcmd

Linux/macOS

Open a terminal and start SteamCMD.

If you installed it using the package from repositories:

cd ~
steamcmd

If you installed it manually:

cd ~/Steam
./steamcmd.sh

SteamCMD Login

Anonymous

To download most game servers, you can login anonymously.

login anonymous

With a Steam account

Some servers require you to login with a Steam Account. Note:For security reasons it is recommended that you create a new Steam account just for your dedicated servers. Note:A user can only be logged in once at any time (counting both graphical client as well as SteamCMD logins).

login <username>

Next enter your password.

If Steam Guard is activated on the user account, check your e-mail for a Steam Guard access code and enter it. This is only required the first time you log in (as well as when you delete the files where SteamCMD stores the login information).

You should see a message stating that you have successfully logged in with your account.

Downloading an app

1. Start SteamCMD and log in.

2. Set your app install directory. (Note: use forward slashes for Linux/macOS and backslashes for Windows.)

force_install_dir <path>

e.g. a directory named cs_go inside the current directory:

force_install_dir ./cs_go/

For Windows: force_install_dir c:\cs_go\

3. Install or update the app using the app_update command (supplying a Steam Application ID). Please check here for the dedicated server list: Dedicated server list. To also validate the app, add validate to the command. To download a beta branch, use the -beta <betaname> option – for example, the HLDS beta branch is named beta and the SrcDS beta branch is named prerelease. Some beta branches are protected by a password; to be able to download from them, also add the -betapassword <password> option.

app_update <app_id> [-beta <betaname>] [-betapassword <password>] [validate]

HLDS is a special case: the App ID is always 90 and a mod must be chosen first. This is done by setting the app config option mod to the requested value.

app_set_config <app_id> <option_name> <option_value>

Example: Install and validate the Counter Strike: Global Offensive dedicated server:

app_update 740 validate

Example: Install and validate HLDS with Team Fortress Classic:

app_set_config 90 mod tfc
app_update 90 validate

Bug: HLDS (appid 90) currently requires multiple runs of the app_update command before all the required files are successfully installed. Simply run app_update 90 validate multiple times until no more updates take place.Example: Install and validate beta version of HLDS (Half-Life):

app_update 90 -beta beta validate

Example: install and validate beta version of the Counter Strike: Source dedicated server:

app_update 232330 -beta prerelease validate

Example: install and validate a private beta version of the Natural Selection 2 dedicated server (name alpha, password natsel):[beta name] is the name of the private beta branch[beta code] is the password for the private beta branch

app_update 4940 -beta alpha -betapassword natsel validate

3. Once finished, type quit to properly log off of the Steam servers.

quit

Validate

validate

Validate is a command that will check all the server files to make sure they match the SteamCMD files. This command is useful if you think that files may be missing or corrupted. Note:Validation will overwrite any files that have been changed. This may cause issues with customized servers. For example, if you customize mapcycle.txt, this file will be overwritten to the server default. Any files that are not part of the default installation will not be affected.

It is recommended you use this command only on initial installation and if there are server issues.

Supported Servers

A list of known servers that use SteamCMD to install is available on the Dedicated Servers List page. Note that any extra commands listed need to be executed before the app_update line.
Install a Minecraft Bukkit Server on CentOS 7

Introduction

Bukkit is an extension of Minecraft, which offers some exclusive features and plugins to improve your gaming experience. Bukkit is a community-driven project that allows every Java developer to write plugins and create additional features.

1. Update the System

Ensure the system is up to date.

$ sudo yum update -y

2. Install Java

Install Java with the yum package manager.

$ sudo yum install java-1.8.0-openjdk

Verify the Java installation was successful.

# java -version

3. Download Bukkit

Create the Bukkit installation folder.

# mkdir /root/mc

Download Bukkit. This example uses version 1.15.2. You should select the most recent release from this list.

# cd /root/mc && wget https://cdn.getbukkit.org/craftbukkit/craftbukkit-1.15.2.jar

4. Run Bukkit

Accept the EULA.

# echo "eula=true" > eula.txt

Run Bukkit.

# java -Xmx1G -Xms1G -jar craftbukkit-1.15.2.jar

Replace 1G with the amount of RAM you would like to allocate.

5. Make Bukkit Persistent

Bukkit does not run in the background by default. Run it in a screen session so that it remains active after you log out.

# screen java -Xmx1G -Xms1G -jar craftbukkit-1.15.2.jar

Replace 1G with the amount of RAM you would like to allocate.

Conclusion

For more information on how to use and customize Bukkit, please refer to the official Bukkit documentation.

Install and configure VMware vSphere ESXi 7

Install VMware ESXi 7, In this blog, I will explore how to Run VMware ESXi 7 Host and configure inside VMware Workstation

How to Download VMware vSphere ESXi 7 Host

First, we would like to create an account, after creating an account you can download the trial version for 60 days.

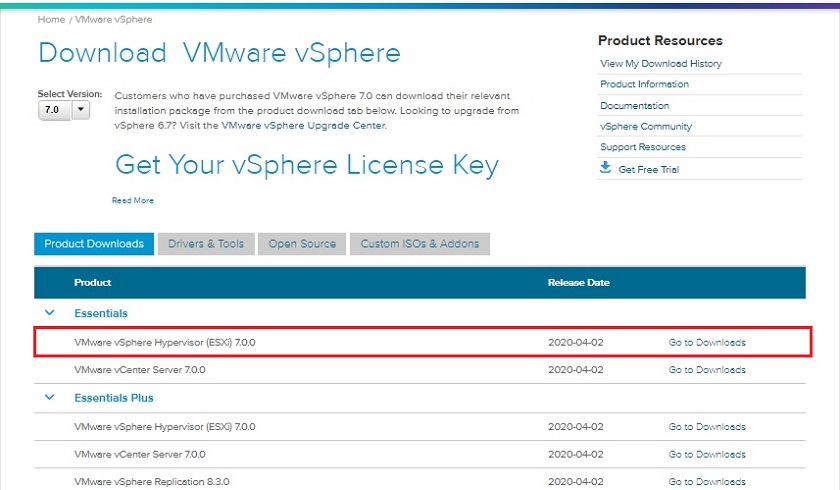
1- Download VMware vSphere ESXi 7 so click here

Now I have my VMware ESXi 7 download ready and I am ready to install

How to create a Virtual Machine in VMware Workstation, so change the boot option from the bios to boot from ISO

Install VMware ESXi 7

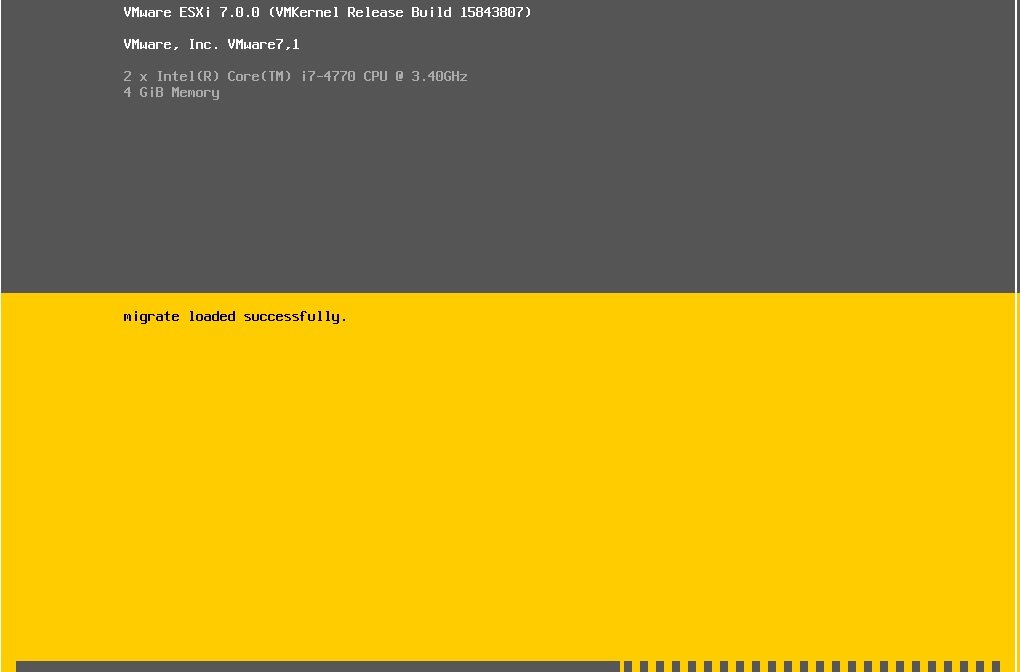
2- It starts loading the files into memory to install the VMware ESXi 7

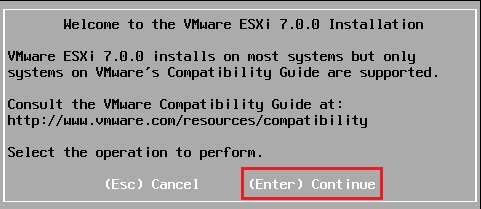
3- Press enter to start the installation

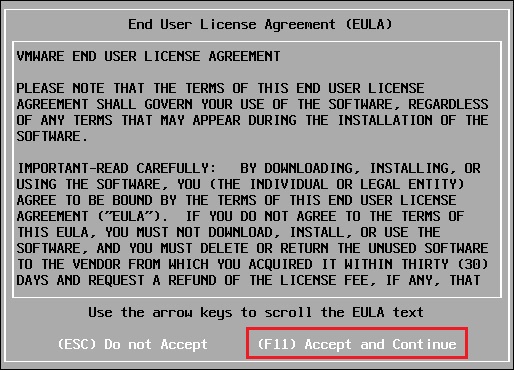
4- So, press the F11 key to accept the user license

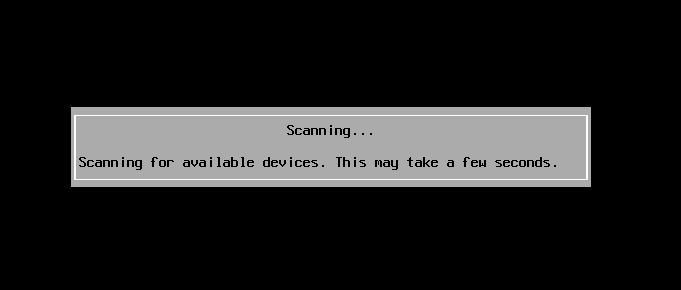
5- Its start scanning for the available devices

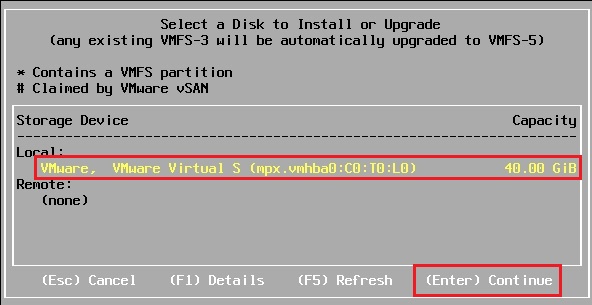
6- Select a disk to install ESXI 7, and then press enter

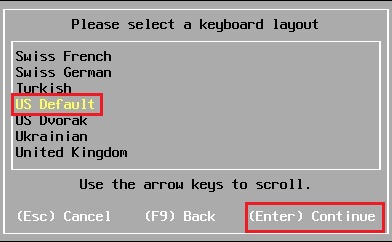
7- Keyboard layout and then press enter to continue

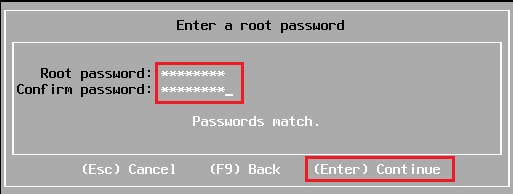
8- Type a root password, confirm password and then press enter to continue

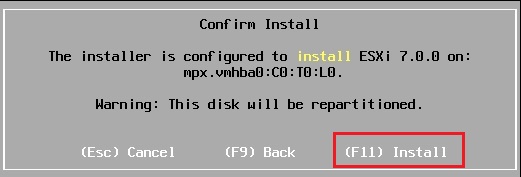
9- The installer is configured to install VMware ESXI 7, so press F11 to start the installation

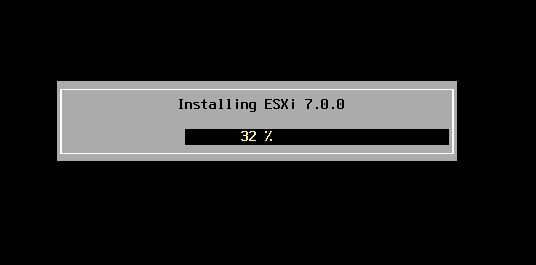
10- The VMware ESXi 7 installation in progress and it will take a few minutes to complete

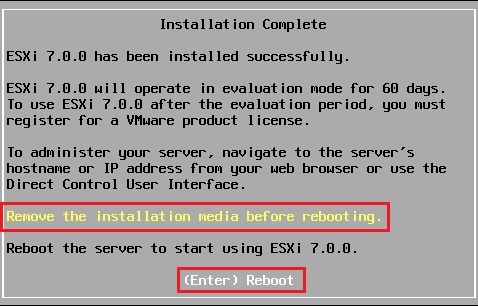
11- ESXi 7 installation successfully completed, please remove the installation media and then press enter to reboot the host

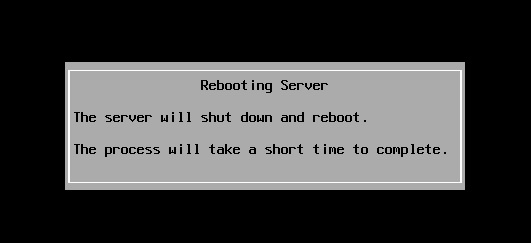
12- The ESXi 7 host server is rebooting

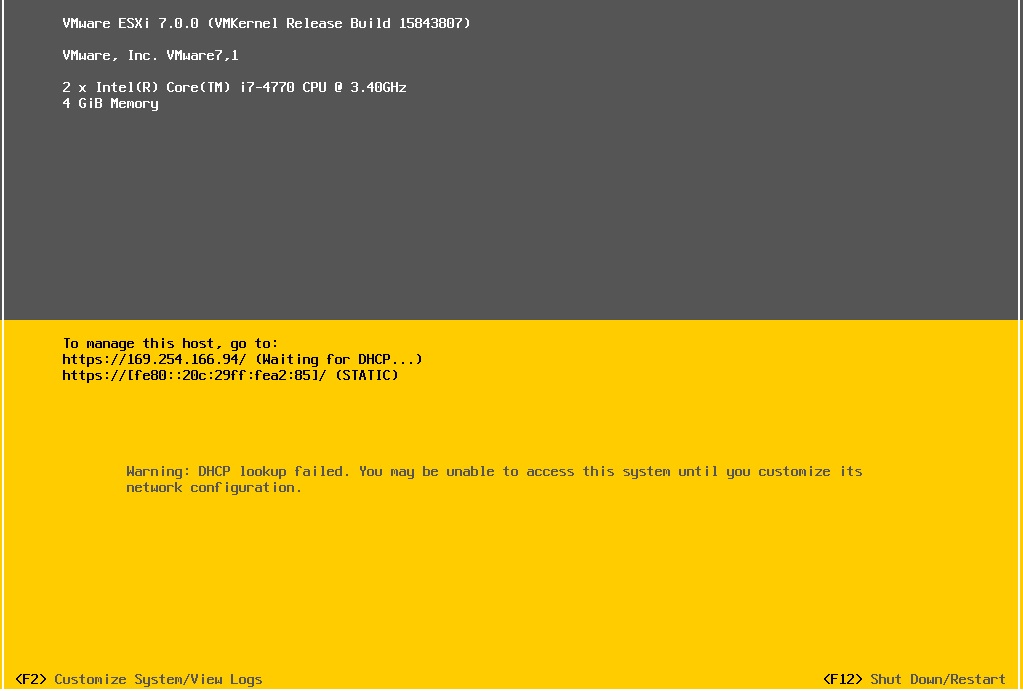
13- After successfully installed

Configure VMware ESXi 7

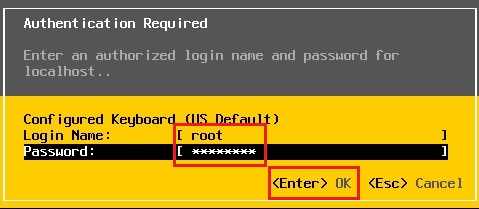
14- Once we have our VMware ESXi 7 host installed we need to configure, Press F2 for all options. F12 to restart and then turn off the VMware ESXi 7 host, Press F2, type your root password and press enter to continue

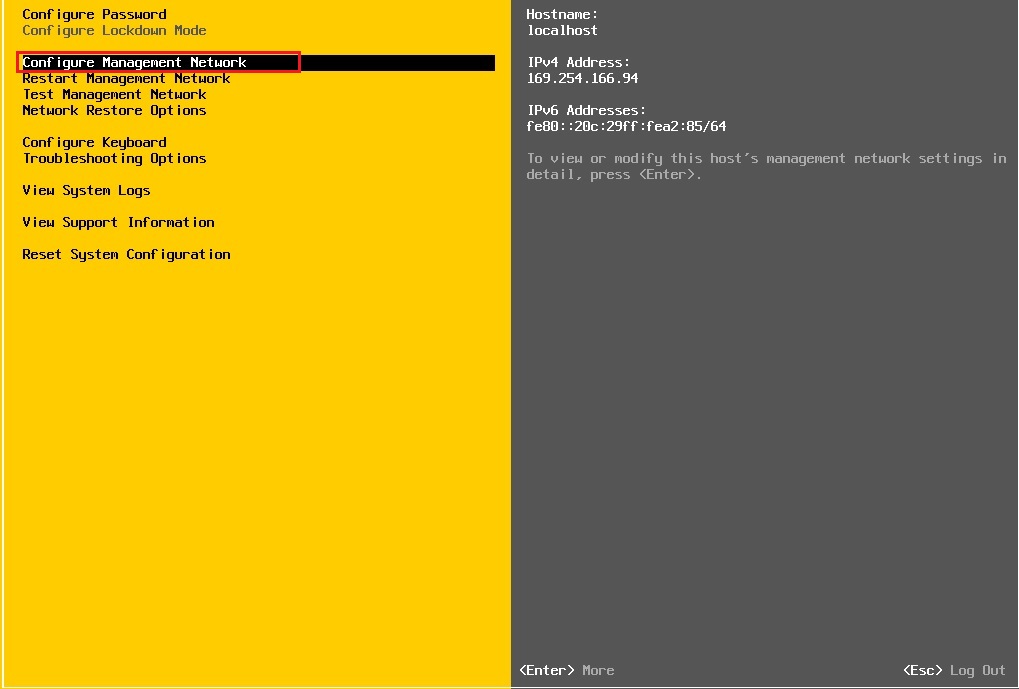
15- Configure Management Network option and press enter

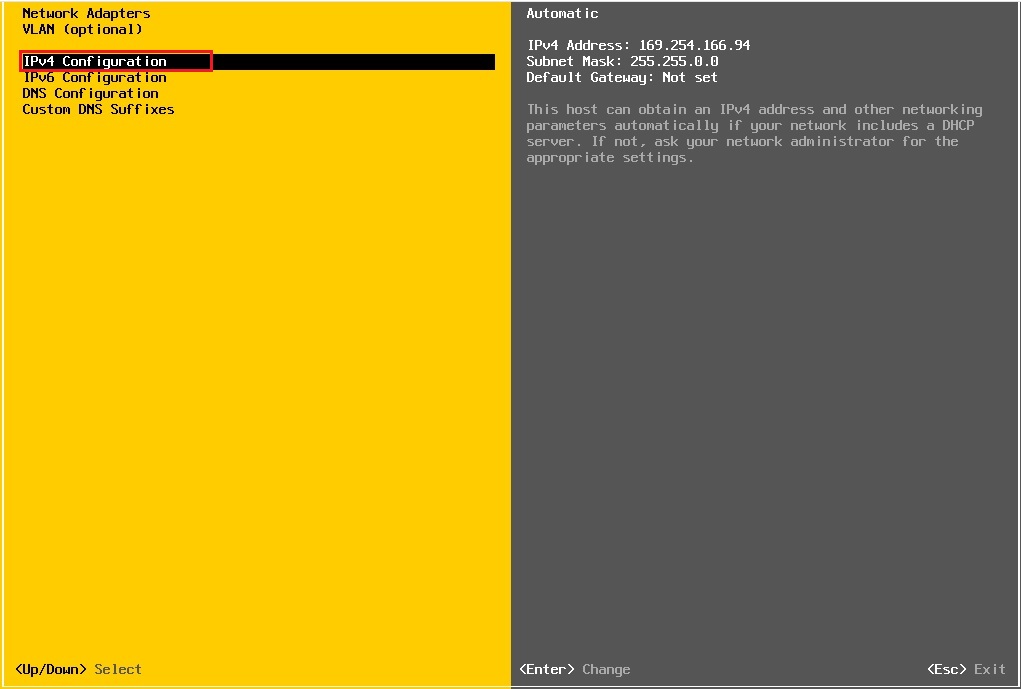
16- IPv4 Configuration option and press enter

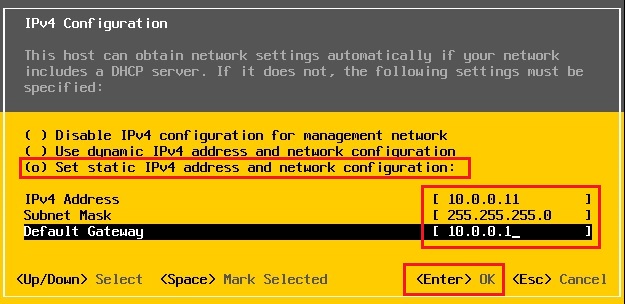
17- VMware ESXi 7, Choose set static IPv4 address and network configuration, type your IP Address, subnet mask, default gateway, and press enter

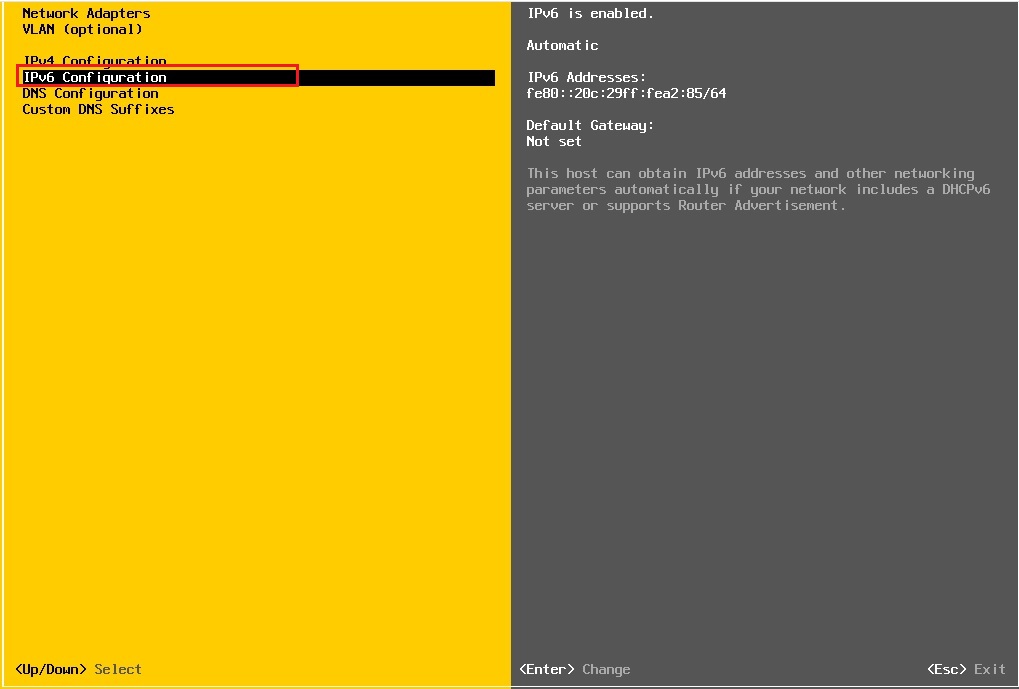
18- IPv6 Configuration option and press enter

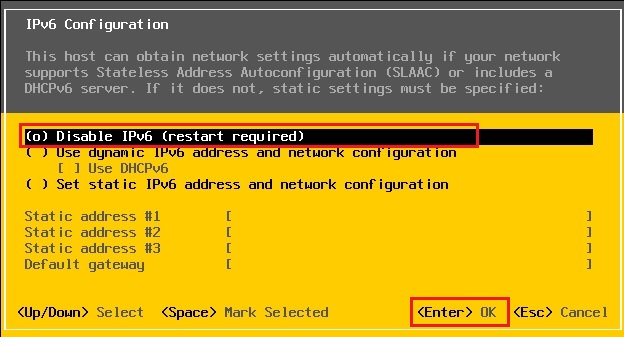
19- I recommend that you disable IPv6 (restart required) and press enter

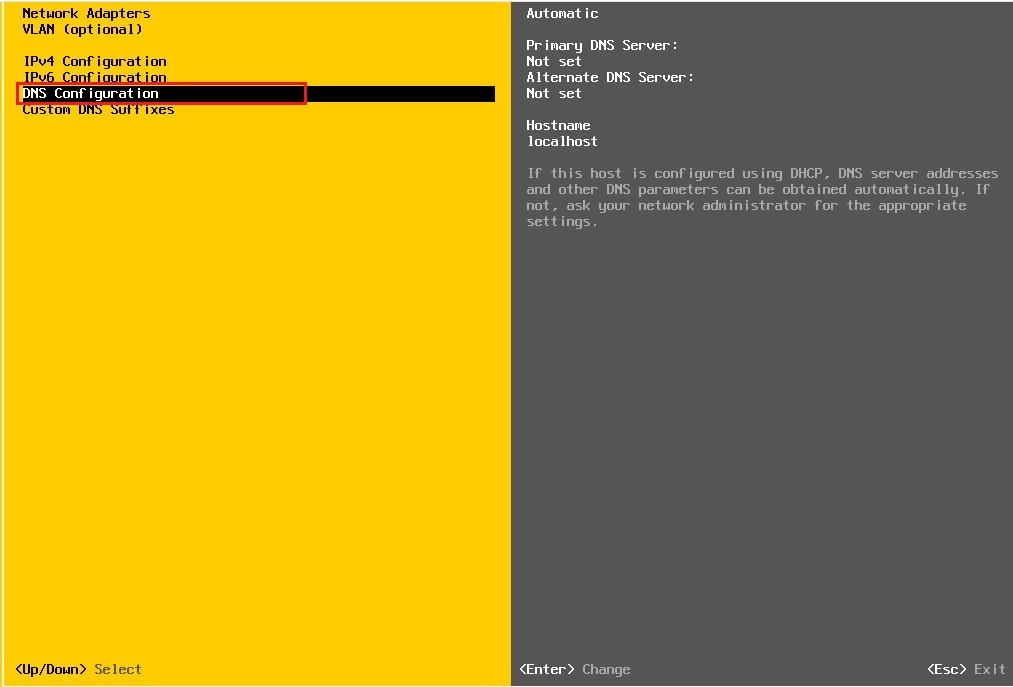
20- DNS Configuration option and press enter

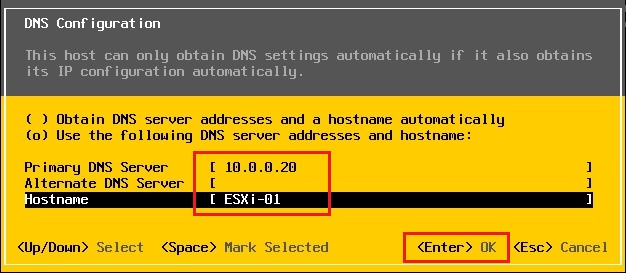
21- Enter primary DNS server IP Address, hostname and press enter

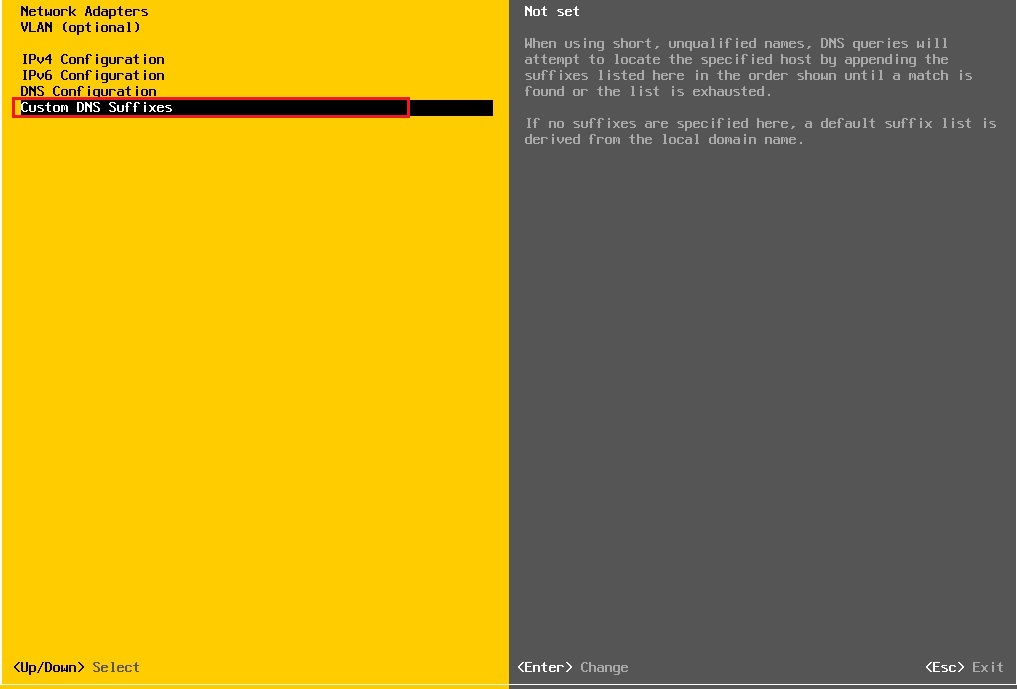
22- Choose a custom DNS suffixes option and hit enter

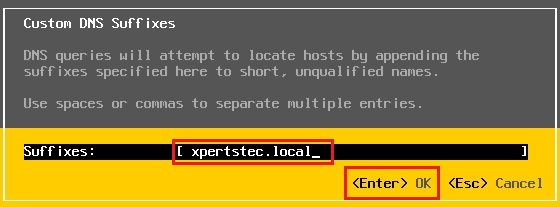
23- Type your custom DNS suffixes and hit enter

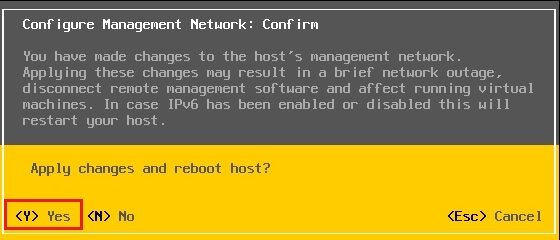
24- Press the Esc button, then press the Y button to apply changes and reboot host

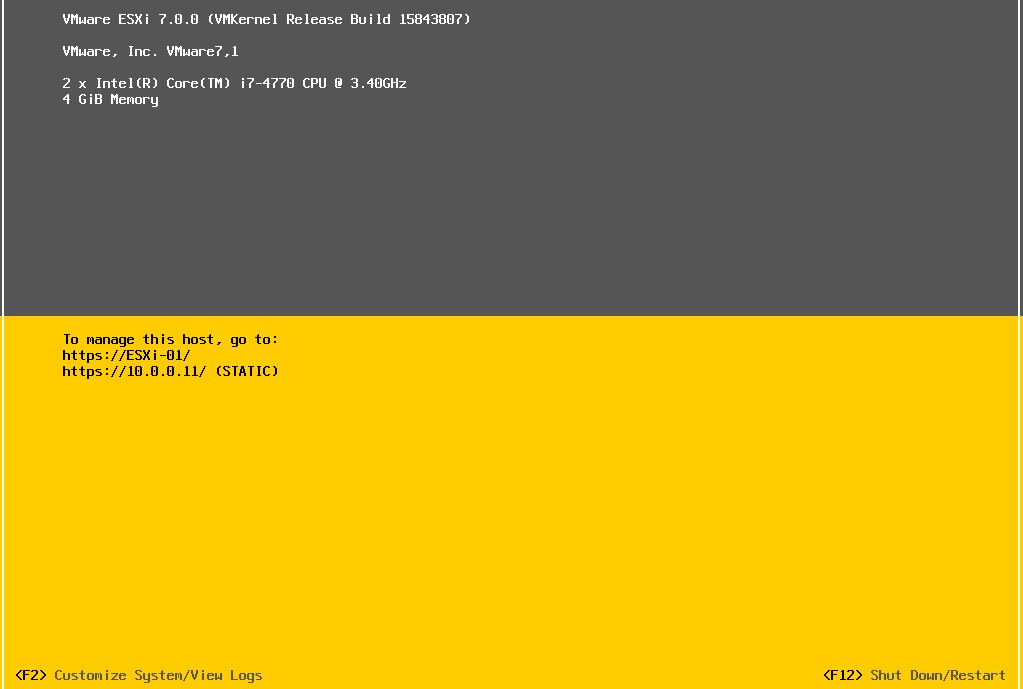
25- ESXi host restarting

26- Now the VMware ESXi 7 host configuration completed

27- Now you can type your VMware ESXi 7 hostname or IP Address in your browser and access your ESXi 7 with the web client, type your root user name and password and click the Login button

Install Let’s Encrypt Plugin

Installation

To install the plugin, perform the following steps:

  1. Log in to the server in as the root user.
  2. Run the following command:/usr/local/cpanel/scripts/install_lets_encrypt_autossl_provider

Uninstall the plugin

To uninstall the plugin, perform the following steps:

  1. Log in to the server as the root user.
  2. Run the following command:/usr/local/cpanel/scripts/uninstall_lets_encrypt_autossl_provider

Install Varnish Cache for Apache on CentOS 7

2. Install Apache

Install Apache HTTP server.

$ sudo yum install -y httpd

Set Apache port to 8080. Edit httpd.conf with nano.

$ sudo nano /etc/httpd/conf/httpd.conf

Change the line “Listen 80” to “Listen 8080“, then save and close the file. The line should like like this when finished.

    Listen 8080

Start the Apache service.

$ sudo systemctl start httpd.service
$ sudo systemctl enable httpd.service

3. Test Apache configuration

Create a test file.

$ sudo touch /var/www/html/test.html

Use curl to test the server at port 8080. This verifies Apache is configured correctly.

$ curl -I http://localhost:8080/test.html

HTTP/1.1 200 OK
Date: Fri, 10 Jul 2020 13:10:04 GMT
Server: Apache/2.4.6 (CentOS)
Last-Modified: Fri, 10 Jul 2020 13:09:56 GMT
ETag: "0-5aa160eb192a8"
Accept-Ranges: bytes
Content-Type: text/html; charset=UTF-8

4. Install Varnish

Add the EPEL repository.

$ sudo yum install -y epel-release

Install the dependency packages.

$ sudo yum install -y pygpgme yum-utils

Add the Varnish Cache repository. Edit /etc/yum.repos.d/varnish60lts.repo

$ sudo nano /etc/yum.repos.d/varnish60lts.repo

Paste the following, then save and close the file.

[varnish60lts]
name=varnishcache_varnish60lts
baseurl=https://packagecloud.io/varnishcache/varnish60lts/el/7/x86_64
repo_gpgcheck=1
gpgcheck=0
enabled=1
gpgkey=https://packagecloud.io/varnishcache/varnish60lts/gpgkey
sslverify=1
sslcacert=/etc/pki/tls/certs/ca-bundle.crt
metadata_expire=300

Update the yum cache for the Varnish repo.

$ sudo yum -q makecache -y --disablerepo='*' --enablerepo='varnish60lts'

Install Varnish.

$ sudo yum install -y varnish

Verify Varnish is installed and the correct version.

$ sudo varnishd -V
varnishd (varnish-6.0.6 revision 29a1a8243dbef3d973aec28dc90403188c1dc8e7)
Copyright (c) 2006 Verdens Gang AS
Copyright (c) 2006-2019 Varnish Software AS

Enable Varnish at system boot.

$ sudo systemctl enable --now varnish

Configure Varnish to listen at port 80, from the default of 6081. Edit varnish.service with nano.

$ sudo nano /usr/lib/systemd/system/varnish.service

Change the line beginning with ExecStart from port 6081 to port 80, then save and close the file. The line should like like this when finished.

ExecStart=/usr/sbin/varnishd -a :80 -f /etc/varnish/default.vcl -s malloc,256m

Restart the Varnish service.

$ sudo systemctl daemon-reload
$ sudo systemctl restart varnish

5. Test the Installation

Use curl to test from the server console.

$ curl -I http://localhost/test.html

The output should resemble this. The X-Varnish: 2 and Via: 1.1 varnish (Varnish/6.0) headers appear when Varnish Cache is running.

HTTP/1.1 200 OK
Date: Thu, 09 Jul 2020 18:46:00 GMT
Server: Apache/2.4.6 (CentOS)
Last-Modified: Thu, 09 Jul 2020 18:45:53 GMT
ETag: "0-5aa06a2507662"
Content-Length: 0
Content-Type: text/html; charset=UTF-8
X-Varnish: 2
Age: 0
Via: 1.1 varnish (Varnish/6.0)
Accept-Ranges: bytes
Connection: keep-alive

Test from your local workstation, substitute your instance’s IP address. Verify the Varnish headers appear.

Linux

$ curl -I http://192.0.2.123/test.html

Windows PowerShell

PS> curl -Uri http://192.0.2.123/test.html

Troubleshooting

Check ports

Use the ss utility to verify which processes are listening on which ports.

# ss -lnpt | grep 80
LISTEN     0      128          *:80                       *:*                   users:(("cache-main",pid=2253,fd=3),("varnishd",pid=2243,fd=3))
LISTEN     0      128       [::]:80                    [::]:*                   users:(("cache-main",pid=2253,fd=5),("varnishd",pid=2243,fd=5))
LISTEN     0      128       [::]:8080                  [::]:*                   users:(("httpd",pid=1373,fd=4),("httpd",pid=1372,fd=4),("httpd",pid=1371,fd=4),("httpd",pid=1370,fd=4),("httpd",pid=1369,fd=4),("httpd",pid=1368,fd=4))

Make sure varnishd is listening on port 80 and httpd is on port 8080 as shown.

Test with curl

$ curl -I http://localhost/test.html

HTTP/1.1 503 Backend fetch failed
Date: Fri, 10 Jul 2020 14:01:13 GMT
Server: Varnish
Content-Type: text/html; charset=utf-8
Retry-After: 5
X-Varnish: 2
Age: 0
Via: 1.1 varnish (Varnish/6.0)
Content-Length: 278
Connection: keep-alive

If curl returns “HTTP/1.1 503 Backend fetch failed” as shown above, check the /etc/varnish/default.vcl file.

$ nano /etc/varnish/default.vcl

Make sure the backend default section points to Apache at port 8080.

backend default {
    .host = "127.0.0.1";
    .port = "8080";
}

Install KVM virtualizor

nstalling Softaculous Virtualizor for Linux-KVM is very simple.

Requirements

  • CentOS 5.x / 6.x / 7.x or Red Hat Enterprise Linux 5.x / 6.x or Scientific Linux 5.x / 6.x or Ubuntu 12.04 or Ubuntu 14.04 or Ubuntu 16.04(x86_64)
  • yum / apt-get
  • Storage to create the VPS (DomUs) disks

Notes :-
1. KVM module does not support 32 bit operating system. Please install a 64 bit OS if you want to install KVM.
2. KVM module requires VT enabled from the BIOS to be loaded.
3. We strongly recommend you make the bridge permanent. Guide – Making the bridge permanent
4. If you are using Ubuntu 18.04, please go through the following guide for making KVM bridge : KVM Bridge on Ubuntu 18.04

Partition Scheme

PartitionSizeDescription
/80-100 GBRoot partition containing all Hardware Node operating system files, OS templates and ISOs
SWAP4 GB +Paging partition for the Linux operating system(Swap memory is been used by virtual servers if there is shortage of real memory)
StorageAll the remaining space on the hard diskThis partition can be used to create either Logical Volumes or File Based Storage for the VPS (DomUs).
NOTE for LVM : You must NOT create any Logical Volume and MOUNT it. This must be an EMPTY VOLUME GROUP.
Virtualizor will not delete any pre-existing LVs in the Volume Group. But its recommended to have an empty Volume Group.

NOTE for File Storage : You must create and mount the folder.

Supported storage types

( LVM | File | Thin LVM | ZFS | ZFS Thin | ZFS Compressed | ZFS Thin Compressed | Ceph Block Device )

Installation

Open a Shell Terminal (e.g. PuTTY) and SSH to your server. Run the following commands:

wget -N http://files.virtualizor.com/install.sh 
chmod 0755 install.sh 
./install.sh email=your@email.com kernel=kvm 

Please give the email address correctly !

Installation Parameters

  • email – The Admin Email Address
  • kernel – In this case its kvm
  • noos – If you don’t want to download the DomU operating system for the DomU then please add noos=true as a parameter
  • beta – If there is a newer version of Virtualizor available and you would like to test it then please add beta=true as a parameter
  • nested_virt – If you want to enable Nested Virtualization on your server then please add nested_virt=1 as a parameter. If you enable this, it will install a new kernel for enabling nested virtualization.
  • lvg (optional) – If you are going to use LVM for the VPS storage. The Volume Group that will be used for the DomU (VPS) storage e.g. defaults to vg. It should have some OR ALL unallocated space to create LVMs for the VPS.
  • interface – You can specify the default interface that you want to set. If not provided it will be considered as eth0.
  • license – In case you are installing Virtualizor on internal network you will need to provide the VALID license key. To get internal license key you will need to open a support ticket.

The installation will begin immediately. It may seem that the installation has stopped, if your network speed is slow, but please let it continue. You will see something like this :


After the installation is completed you will be asked to reboot.

You can then visit the Admin Panel to create the Storage and the Virtual Servers and also manage your server.

Note : A log file of the installation process will be created – /root/virtualizor.log

Login

To login to the Softaculous Virtualizor Admin Panel, visit the following URL :https://Your-Server-IP:4085/http://Your-Server-IP:4084/

Login with the servers root details.

Admin Panel

After you login, you will see the Admin Panel Dashboard :

Ports

Virtualizor uses ports from 4081 – 4085. If there is any firewall restricting this, you will need to allow these ports.

For RHEL & CentOS < 7

iptables -I INPUT 1 -p tcp -m tcp --dport 4081:4085 -j ACCEPT
iptables -I INPUT 2 -p tcp -m tcp --dport 5900:6000 -j ACCEPT

For RHEL & CentOS 7+

firewall-cmd --zone=public --permanent --add-port=4081-4085/tcp
firewall-cmd --zone=public --permanent --add-port=5900-6000/tcp 
NOTE: If you are going to use Webuzo templates for VM creation, please allow ports 2002-2005

Create Storage

Before creating any VMs, its necessary to define your storage.
Navigate to Virtualizor Admin Panel -> Storage -> Add Storage
You will see the following wizard :

Fill in the details and define the storage.

NOTE: If you are using RAID setup on your server, please create the VG from RAID disks (e.g. /dev/md1) and not from the actual disks (e.g /dev/sda1).
Please note that disk names can be different as per your setup, above explanation is just for an example.

Virtualizor Network in KVM

By default eth0 will be assumed as the Network Interface. To tell virtualizor to use anything other Network Interface, You need to set it here.

You can change these settings any time from the Virtualizor Admin Panel -> Configuration -> Slave Settings. The following is a screenshot of the available settings :

Virtualizor will create a viifbr0 bridge.
viifbr0 detects the IP, Netmask, GATEWAY from :

/etc/sysconfig/network-scripts/ifcfg-INTERFACE_NAME

Hence if you change the above file, you will need to restart the virtualizor network :

root> service virtnetwork restart

Start Command :

root> service virtnetwork start

Stop Command :

root> service virtnetwork stop

Trouble Shoot

NOTE : In all cases please remember to disable SElinux. The Virtualizor installer will try to disable it. For KVM make sure that VT is enabled from bios so VPS can be able to started .

Cant open http://IP-Address:4084

Please check if your iptables firewall is running You can disable it with the following command :

root> service iptables stop

For CentOS 7 :

root> systemctl stop firewalld

Disk resize issue on Ubuntu 16 and Ubuntu 18

NOTE : For vps hostname/disk resize issues on Ubuntu 16.04 and Ubuntu 18.04 with sfdisk version 2.27.1 , follow these steps to downgrade sfdisk on the server :

mv /sbin/sfdisk /sbin/sfdisk_new
wget -O /sbin/sfdisk http://files.virtualizor.com/utility/sfdisk
chmod 755 /sbin/sfdisk

install CFS

Installation
============
Installation is quite straightforward:

cd /usr/src
rm -fv csf.tgz
wget https://download.configserver.com/csf.tgz
tar -xzf csf.tgz
cd csf
sh install.sh

Next, test whether you have the required iptables modules:

perl /usr/local/csf/bin/csftest.pl

Don't worry if you cannot run all the features, so long as the script doesn't
report any FATAL errors

You should not run any other iptables firewall configuration script. For
example, if you previously used APF+BFD you can remove the combination (which
you will need to do if you have them installed otherwise they will conflict):

sh /usr/local/csf/bin/remove_apf_bfd.sh

That's it. You can then configure csf and lfd by reading the documentation and
configuration files in /etc/csf/csf.conf and /etc/csf/readme.txt directly or
through the csf User Interface.

csf installation for cPanel and DirectAdmin is preconfigured to work on those
servers with all the standard ports open.

csf auto-configures your SSH port on installation where it's running on a non-
standard port.

csf auto-whitelists your connected IP address where possible on installation.

You should ensure that kernel logging daemon (klogd) is enabled. Typically, VPS
servers running RedHat/CentOS v5 have this disabled and you should check
/etc/init.d/syslog and make sure that any klogd lines are not commented out. If
you change the file, remember to restart syslog.

See the csf.conf and readme.txt files for more information.

Perl Modules
============

While most should be installed on a standard perl installation the following
may need to be installed manually:

# On rpm based systems:
yum install perl-libwww-perl.noarch perl-LWP-Protocol-https.noarch perl-GDGraph

# On APT based systems:
apt-get install libwww-perl liblwp-protocol-https-perl libgd-graph-perl

# Via cpan:
perl -MCPAN -eshell
cpan> install LWP LWP::Protocol::https GD::Graph


InterWorx
=========

1. Enable csf in InterWorx > NodeWorx > Plugins > csf

2. See the InterWorx section in /etc/csf/readme.txt


Webmin Module Installation/Upgrade
==================================

To install or upgrade the csf webmin module:

Install csf as above
Install the csf webmin module in:
  Webmin > Webmin Configuration > Webmin Modules >
  From local file > /usr/local/csf/csfwebmin.tgz > Install Module


Uninstallation
==============
Removing csf and lfd is even more simple:

cd /etc/csf
sh uninstall.sh